Window Technical Support

  • Subscribe to our RSS feed.
  • Twitter
  • StumbleUpon
  • Reddit
  • Facebook
  • Digg

Wednesday, 27 November 2013

Installing DHCP and Windows Deployment Services

Posted on 05:29 by Unknown

DHCP Introduction

When you deploy Dynamic Host Configuration Protocol (DHCP) servers on your network, you can automatically provide client computers and other TCP/IP-based network devices with valid IP addresses. You can also provide the additional configuration parameters these clients and devices need, called DHCP options, that allow them to connect to other network resources, such as DNS servers, WINS servers, and routers.

 IP addresses can be configured statically or dynamically. Normally we configure static IP addresses on network devices like routers, switches, firewalls and servers while we dynamically assign IP addresses to computers, laptops, tablets, smartphones etc. The dynamic method uses DHCP (Dynamic Host Configuration Protocol) and in this short article I want to show you how it works. Let’s take a look at the following picture:

DHCP Topology

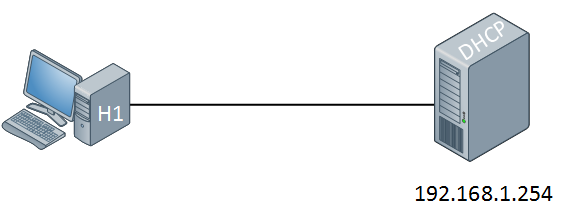
On the left side we have a computer without IP address. On the right side there’s a DHCP server configured with static IP address 192.168.1.254. This DHCP server will supply an IP address to our computer, this is how it works:

DHCP Discover

The computer will send a DHCP discover message. This is a broadcast because it doesn’t have an IP address and it doesn’t know if there is a DHCP server on the network. Of course in our scenario we do have a DHCP server so it will respond to this broadcast as following:

DHCP Offer

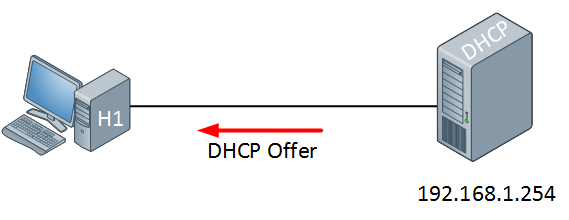
The DHCP server will respond with a DHCP offer message which contains an IP address for the computer (we have to configure the DHCP server to define which IP addresses we want to give). If we want we can also assign a default gateway and DNS server(s) to the computer. The computer will respond to this information:

DHCP Request

The computer will send a DHCP Request in response to the DHCP offer message, asking nicely if it’s OK to use the information that it has received. Our DHCP server will respond to this as following:

DHCP ACK

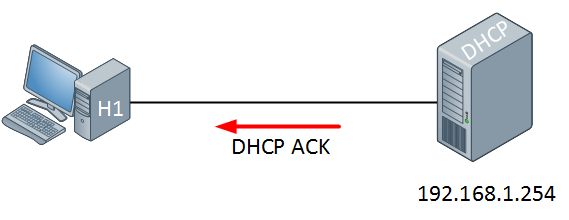
The DHCP server will respond with a DHCP ACK message to tell the computer it’s OK


  • Before installing WDS we have to create a new partition to hold our image files
    1. Open Server Manager
    2. Click Storage
    3. Click Disk Management
    4. Right click Unallocated
    5. Click Create New Volume
    6. Click Next
    7. Click Next
    8. Change drive letter to I
    9. File: NTFS
    10. Allocation: default
    11. Click Next
    12. Volume label: Images
    13. Check Perform Quick Format
    14. Click Next
    15. Click Finish
pic1
  • Open Server Manager
    1. Click Roles in menu at top left
    2. Click Add Roles at right
pic2
  • Check Skip this page by default
  • Click Next
pic1
  • Select Server Roles
    1. Check DHCP
    2. Check Windows Deployment Services
    3. Click Next
pic2
  • Overview of Windows Deployment Services
    1. Click Next
pic3
  • Select Roles Services
    1. Click Next
pic4
  • Check box next to 192.168.9.1
  • Click Next
pic8
  • Specify IPv4 DNS Server Settings
    1. Parent Domain: Adatum9.com
    2. Preferred DNS Server IPv4 Address: 192.168.9.1
    3. Alternate DNS Server IPv4 Address: 192.168.9.2 (Virtual Server)
    4. Click Next
pic6
  • Specify IPv4 WINS Server Settings
    1. Check radio button next to: WINS is not required for applications on this network
    2. Click Next
pic7
  • Add or Edit DHCP Scopes
    1. Click Add
pic8
  • Add Scope
    1. Scope Name: scope9
    2. Starting IP Address: 192.168.9.1
    3. Ending Ip Address: 192.168.9.10
    4. Subnet Mask: 255.255.255.0
    5. Default Gateway (optional): 192.168.9.1
    6. Subnet Type: Wired (lease duration will be 6 days)
    7. Click OK
  • Click Next
pic9
  • Configure DHCPv6 Stateless Mode
    1. Check Disable DHCPv6 stateless mode for this server.
    2. Click Next
pic10
  • Authorize DHCP Server
    1. Check Use current credentials
    2. Click Next
pic11
  • Confirm Installation Selections
    1. Click Install
pic12
  • Installation Results
    1. Click Close
  • Go to Start\Administrative Tools\DHCP
  • Click Properties
  • Click + beside of DHCP
  • Click + beside of IPv4
  • Right click Scope and choose Properties
pic13
  • Click Advanced tab
  • Check Both
  • Click OK
  • How to exclude a range of ip addresses from the DHCP pool.
  • Right click the address pool
  • Click New Exclusion Range
pic14
  • 192.168.9.1
  • 192.168.9.2
  • Click Add
  • Click Close
  • Close DHCP Window
Email ThisBlogThis!Share to XShare to FacebookShare to Pinterest
Posted in | No comments
Newer Post Older Post Home

0 comments:

Post a Comment

Subscribe to: Post Comments (Atom)

Popular Posts

  • Block IP address with Windows Firewall 2008
    If you ever feel that someone may be trying to break into your server or know an IP address that you want to block from accessing ...
  • Windows Server 2008 Command-line Tool
    On an installed and running system the Windows command-prompt window may be accessed from the main panel of the Start menu. The command-pro...
  • Creating a Capture Image in WDS
    How to Create a Capture Image by Using WDS Console " A capture image is created from an existing boot image. You will create a new ca...
  • Configuring Windows Server 2008 Remote Desktop Administration
    Windows Server 2008 is, as the name suggests, a server operating system. In the real world this means that systems running Windows Server ...
  • SMTP Server Configure on Windows Server 2008 R2
    Installing the SMTP feature 1 . Click Start > Run and then enter servermanager.msc in the Open dialogue box then click OK to load Se...
  • Windows Deployment Services Configure in Windows Server 2008 r2
    How to use Windows Deployment Service  1.1 Introduction: Windows Deployment Service (WDS) is an enhanced and redesigned version of Remote I...
  • How to configure ftp server in windows
      FTP Server using IIS 7.0 and Windows Server 2008 Open Server Manager, go to Roles and click “Add Roles” In the Add Role Wizard, select Web...
  • configure Active Directory in Windows Server 2008 R2 Part-2
    Configure Active Directory At the Server Management screen you should now see that you have 1 role installed.  The Active Directory D...
  • VPN connection Configuring on server 2008 R2 using RRAS and configuring clients
    A virtual private network (VPN) is a network that uses a public telecommunication infrastructure, such as the Internet, to provide remote of...
  • FTP Server and its Commands
    What is FTP? The FTP ( F ile T ransfer P rotocol) utility program is commonly used for copying files to and from other computers. These co...

Blog Archive

  • ▼  2013 (91)
    • ►  December (2)
    • ▼  November (10)
      • How To Activate Exchange Server 2010
      • Installing DHCP and Windows Deployment Services
      • Sharing Your Computer with Others Create a Homegroup
      • How to configure ftp server in windows
      • Networking questions answers, Ethernet - Q&A
      • Ethernet frame broadcast
      • Connect Visual Studio 2010 to Your TFS Preview Acc...
      • Add a user to the “Team Foundation Service Account...
      • Install Team Foundation Server (TFS) 2010
      • Create a new Team Project Collection
    • ►  October (5)
    • ►  September (15)
    • ►  August (26)
    • ►  July (1)
    • ►  June (5)
    • ►  May (14)
    • ►  April (5)
    • ►  March (1)
    • ►  February (1)
    • ►  January (6)
Powered by Blogger.

About Me

Unknown
View my complete profile